
Ethereum es la primera «computadora global». Es una red descentralizada que puede ser utilizada por cualquier persona y es capaz de ejecutar aplicaciones sin la posibilidad de tiempo de inactividad, censura o fraude. Ahora, ¿te has preguntado cómo puedes minar Ethereum en una PC convencional con Windows? Si lo que quieres es empezar a extraer ya esta criptomoneda, aquí explicamos cómo hacerlo, veamos.
La minería de Ethereum es una tarea que requiere muchos recursos, mucho tiempo y poder de procesamiento. Los mineros reciben recompensas a cambio de proporcionar soluciones a problemas matemáticos complejos utilizando la tecnología blockchain, al igual que con la minería Bitcoin.
A continuación explicaremos cómo minar Ethereum en una PC con Windows. Para ello, usaremos el cliente de minería Claymore DualMiner y el pool de minería Nanopool.
- Claymore DualMiner es el cliente preferido para la mayoría de los entusiastas de la minería de Ethereum. Les permite extraer Ether junto con otras criptomonedas como Decred / Siacoin / Lbry / Pascal simultáneamente, lo que maximiza la potencia de procesamiento paralelo de la GPU.
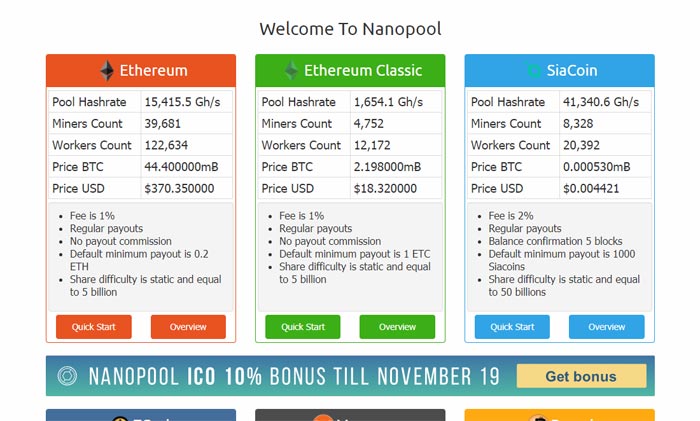
- Nanopool es uno de los pools de minería más populares del momento para minar Ethereum, Ethereum Classic, Zcash y Monero. A través de su sitio oficial https://nanopool.org/ podemos instalar y configurar fácilmente el cliente para mining Claymore Dual Miner, como veremos a continuación.
Requisitos para minar Ethereum en un ordenador con Windows
- Una tarjeta gráfica AMD/NVIDIA con un mínimo de 4 GB de memoria GDDR5*.
- Los últimos controladores gráficos disponibles.
- Windows 7 x64 o superior.
- Una wallet Ethereum, la dirección de tu wallet.
*: Para minar Ethereum este 2018 requerirás una GPU de al menos 4 GB debido al tamaño del archivo DAG. El archivo DAG (Directed Acyclic Graph) es esencialmente una base de datos de la cadena de bloques existente. Para extraer el próximo bloque, tu hardware debe conocer todos los bloques existentes.
Al momento de escribir estas líneas, el DAG tiene poco más de 2 GB y continúa en aumento, se prevee que para mediados o finales e 2018 sea de más de 3 GB. La gran mayoría de los clientes de minería cargan todo el DAG en la VRAM de tu tarjeta gráfica. Sin suficiente capacidad, la GPU ni siquiera podría comenzar las operaciones de mining.
Configuración óptima para minería Ethereum en un ordenador con Windows
Para ver la lista de las mejores piezas de hardware para mineria Ethereum consulta nuestro post El mejor hardware para minería Ethereum 2018
Para calcular el consumo total de energía del equipo, use la calculadora de vatios en línea de Outervision: https://outervision.com/power-supply-calculator
Cómo minar Ethereum en un ordenador con Windows
1. Descarga Jaxx

Necesitamos una wallet (cartera o monedero), una dirección de una wallet Ethereum propia, para recibir las recompensas por cada bloque minado. Hemos elegido Jaxx, una billetera ligera y bastante segura. Jaxx es multiplataforma y admite diferentes criptomonedas, como Bitcoin, Bitcoin Cash, Ethereum, Ethereum Classic, Litecoin, Dash y Zcash, entre otros.
Descarga el cliente Jaxx para Windows desde su sitio oficial https://jaxx.io/, o si lo prefieres, la extensión de Google Chrome, que solo pesa 3MB.
Una vez que se hayas descargado el archivo, ejecútalo y procede a crear una nueva wallet Ethereum (Create New Wallet).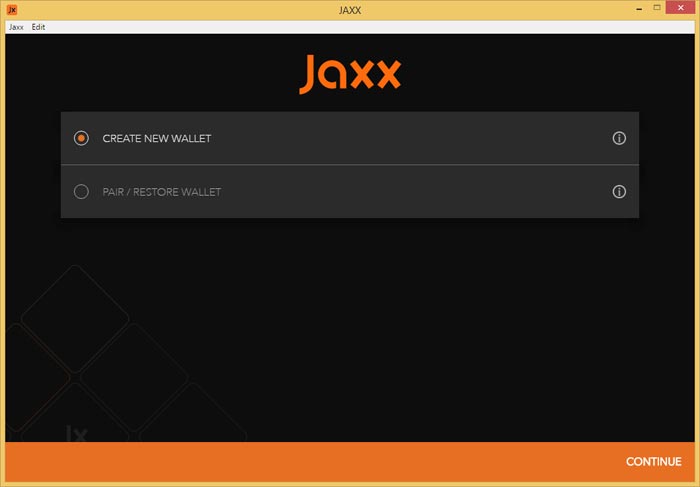
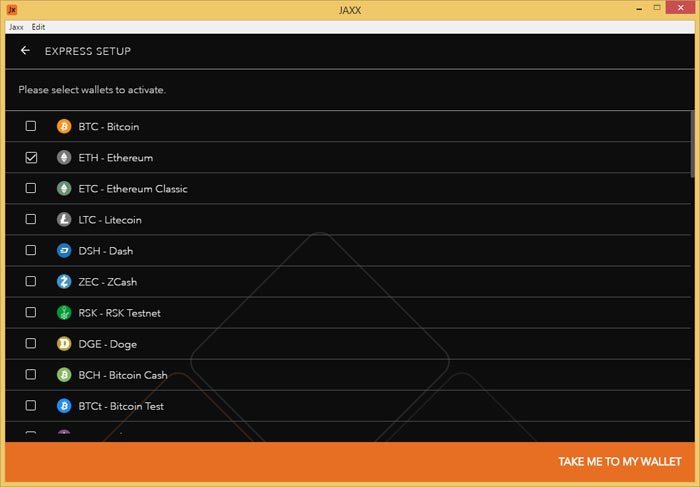
Selecciona «Ethereum» de la lista de opciones y haz clic en «llevarme a mi billetera».
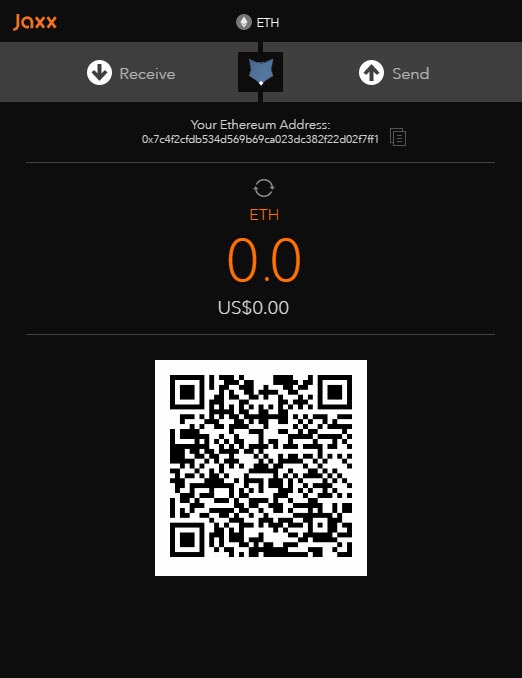
Copia la dirección de tu wallet y guárdala en un lugar seguro, ya que la necesitaremos más tarde.
2. Descarga Claymore
Ahora pasaremos a descargar al cliente de minería Claymore Dual Miner del sitio web de Nanopool. Desde aquí, no solo podemos descargar la versión más compatible del pool de minería, sino que también podemos configurar el cliente de una manera sencilla.
Para hacer esto, vaya a https://nanopool.org/ y hacemos clic en el botón de «Quick start» ubicado en la parte inferior del cuadro Ethereum.
Se abrirá una nueva ventana desde donde descargaremos el cliente de minería (ve a la sección «How to Connect»).
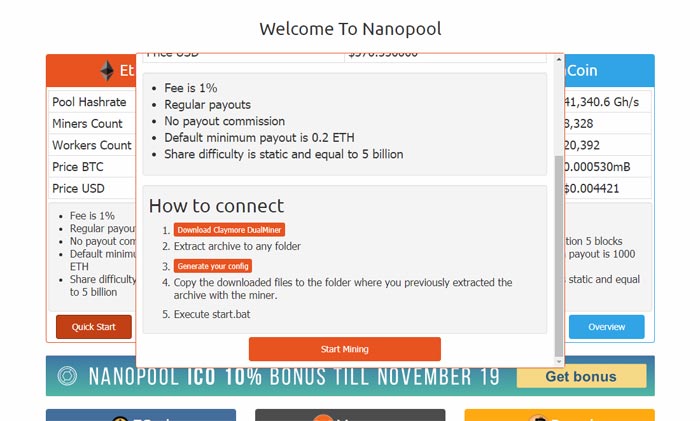
Ahora haz clic en «Download Claymore DualMiner» para iniciar la descarga del cliente, que estará en un archivo .zip («Claymore.s.Dual.Ethereum.GPU.Miner»). Una vez que la hayas descargado, crea una nueva carpeta en cualquier ubicación de tu ordenador (por ejemplo, en «C: / Claymore») y extrae todo el contenido del archivo .zip que acabas de descargar allí.
3. Crea el fichero de configuración
Regresa a la página principal de Nanopool, y desde la ventana de «Quick start» navega hasta la sección «cómo conectar», y ahora haz clic en «config generator».
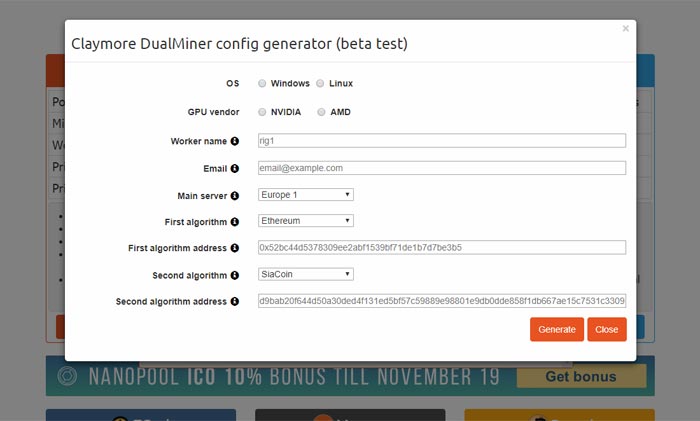
Se abrirá una nueva ventana en la que deberás indicar los parámetros de configuración del cliente de minería:
OS: su sistema operativo (Windows / Linux)
GPU vendor: selecciona el fabricante de tu GPU (NVIDIA / AMD)
Worker name: establezca el nombre de tu trabajador, por ejemplo: «rig1» (trate de no usar espacios en blanco)
Email: ingresa tu dirección de correo electrónico.
Main server: selecciona el servidor más cercano a tu ubicación geográfica.
First algorithm: selecciona el algoritmo principal de minería, en este caso elegiremos Ethereum
First algorithm address: la dirección de tu billetera o la billetera Ethereum (coloca aquí tu dirección de Ethereum en Jaxx)
Second algorithm: selecciona el algoritmo de minería secundaria para minería dual, o si lo prefieres, selecciona «ninguno» para minar solo Ethereum
Second algorithm address: ingresa la dirección de la billetera del algoritmo secundario (si solo vas a minar Ethereum, deja este campo en blanco)
Una vez que hayas terminado, haz clic en «generar». Nanopool creará los archivos necesarios para configurar el minero. Al finalizar, se descargará una carpeta comprimida (claymore_config_nanopool.zip) con los siguientes archivos:
epools.txt
start.bat
Extrae estos 2 archivos en la carpeta donde previamente extrajiste los archivos del cliente Claymore mining.
4. Ejecuta el minero
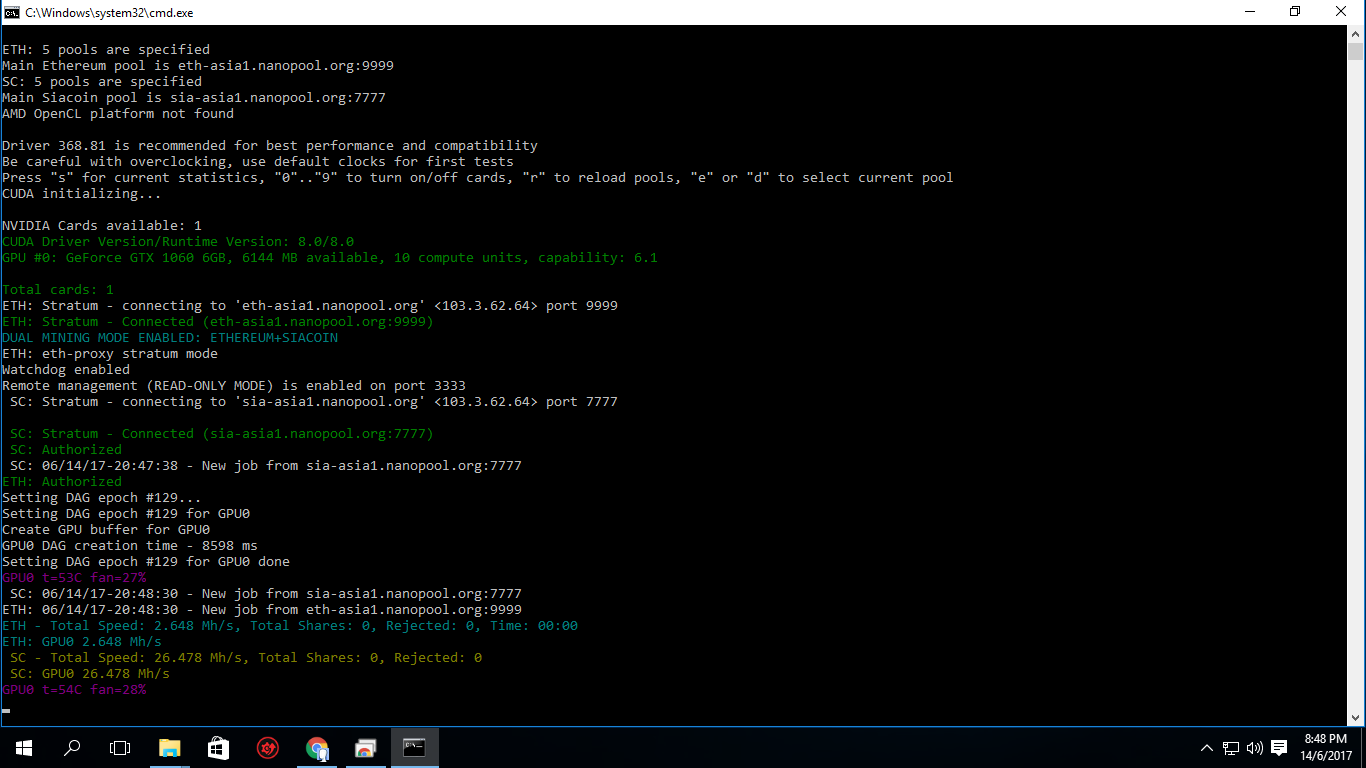
Nuestro cliente de minería ahora está listo para comenzar a minar Ethereum. Para comenzar, solo tenemos que ejecutar el archivo start.bat que acabamos de extraer en la carpeta contenedora, y una vez hecho esto, solo tendremos que esperar a que comience. Se abrirá una nueva ventana de comando que indica la velocidad y otras estadísticas de minería. No necesitaremos hacer nada más.
¡Felicitaciones! Ya estás minando Ethereum en tu PC.
5. Revisa el estado de tu rig
Una vez que comencemos a minar, podemos verificar que todo funcione correctamente ingresando nuestra dirección de Ethereum al sitio web de Nanopool.
Ingresa al portal de minería Nanopool Ethereum: https://eth.nanopool.org/
Copia la dirección de tu wallet Ethereum y pégala en el cuadro de búsqueda ubicado en la barra de navegación superior (donde se indica «Address») y luego haz clic en «Search»
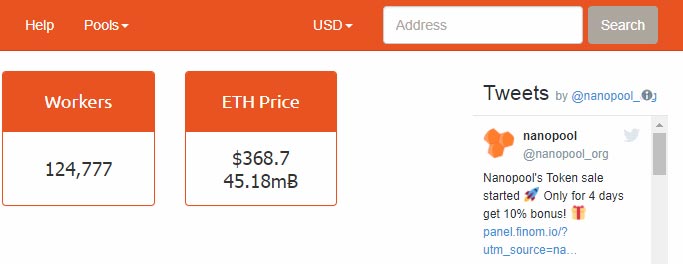
Si todo funciona correctamente, una página se cargará con las últimas estadísticas de tu equipo de minería, tiempo de minería, hashrate, ingresos, etc.
Minería Ethereum en un ordenador con Windows, veredicto
Como puedes ver, esta es una de las formas más fáciles de extraer Ethereum hoy en día. Si tienes problemas o prefieres un método más simple, hay algunas opciones disponibles en el mercado, como los clientes de minería como MinerGate (https://es.minergate.com/) y Nicehash (https: //miner.nicehash). .com /).
Estos clientes mineros se recomiendan especialmente si no tienes mucha experiencia, ya que tienen una interfaz gráfica intuitiva y también tienen algunas funciones avanzadas, como extraer la criptomoneda más rentable del momento de manera automática.[:en]¿How to mine Ethereum on windows? Ethereum mining is a task that requires many resources, a lot of time and processing power. Ethereum miners receive rewards in exchange for providing solutions to complex mathematical problems using blockchain technology, just like with Bitcoin mining.
Ethereum is the first «global computer». It is a decentralized network that can be used by anyone and is capable of running applications without the possibility of downtime, censorship or fraud. But have you ever wondered how you can mine Ethereum on a conventional PC? If what you want is to start mining this cryptocurrency right now, here we explain how.
In this tutorial we will explain how to mine Ethereum on a Windows PC. We have chosen the Claymore DualMiner mining client and the Nanopool mining pool.
Claymore DualMiner is the default client of most Ethereum mining enthusiasts. It allows you to mine Ether along with another cryptocurrency such as Decred / Siacoin / Lbry / Pascal simultaneously, thereby maximizing the parallel processing power of the GPU.
Nanopool is one of the most popular mining pools of the moment to mine Ethereum, Ethereum Classic, Zcash and Monero. Through its official site https://nanopool.org/ we can easily install and configure the Claymore Dual Miner mining client, as we will see below.
Some of the advantages of this mining pool are the following:
- The rate is only 1%
- Regular payments
- No extra payment commission
- The default minimum payment is 0.2 ETH
- Adjustable minimum payment threshold
Requirements
- An AMD / NVIDIA graphics card with a minimum of 3 GB of GDDR5 memory *
- The latest graphics drivers available
- Windows 7 x64 or higher
- A wallet address or Ethereum wallet.
* Ethereum mining at this point requires a GPU at least 3 GB due to the size of the DAG file. The DAG (Directed Acyclic Graph) file is essentially a database of the existing blockchain. To extract the next block, your hardware must know all the existing blocks. At the time of writing, the DAG is just over 2 GB and continues to grow. The vast majority of mining customers load all the DAG into the VRAM of your graphics card. Without sufficient capacity, the GPU can not even start mining operations.
Optimal configuration of Ethereum mining on a Windows PC
Based on expert opinions, we believe that this is the best possible configuration for mining Ethereum and other cryptocurrencies based on the Ethash algorithm (November 2017):
- Processor: Intel Celeron G3900 – LGA1151
- Motherboard: Gigabyte GA-H110-D3A – LGA1151
- GPU: Sapphire Radeon NITRO + RX 580 8GB
- RAM Memory: Ballistix Sport LT 4GB DDR4
- SSD drive: Silicon Power 60GB SSD
- Power supply (up to 5 GPUs): * EVGA SuperNOVA 1200 P2 80+ PLATINUM
* To calculate the total energy consumption of the equipment use the Outervision online watt calculator: https://outervision.com/power-supply-calculator
How to mine Ethereum on a Windows PC
1. Download Jaxx
We need a wallet or Ethereum wallet address to receive the rewards for each mined block. In this case we have chosen Jaxx, a light wallet and quite safe. Jaxx is multiplatform and supports different cryptoactives, such as Bitcoin, Bitcoin Cash, Ethereum, Ethereum Classic, Litecoin, Dash and Zcash, among others.
Download the Jaxx client for Windows from its official site https://jaxx.io/, or if you prefer, the extension of Google Chrome, which only weighs 3MB.
Once the file is downloaded, run it and proceed to create a new Ethereum wallet.
Select «Ethereum» from the list of options and click «take me to my wallet»
Copy the address of your wallet and keep it in a safe place, as we will need it later
2. Download Claymore
The next step will be to download the Claymore Dual Miner mining client from Nanopool website. From here we can not only download the most compatible version of the mining pool, but we can also configure the client in a simple way.
To do this, go to https://nanopool.org/ and click on the «quick start» button located at the bottom of the Ethereum box.
A new window will open from where we will download the mining client (navigate to the «How to connect» section).
Now click on «Download Claymore DualMiner» to start the client download, which will be contained in a .zip file («Claymore.s.Dual.Ethereum..GPU.Miner»). Once you have downloaded it, create a new container folder in any location of your PC (For example in: «C: / Claymore»), and extract all the contents of the .zip file that you just downloaded there.
3. Create the configuration file
Go back to the main page of Nanopool, and from the «quick start» window navigate to the «how to connect» section, and now click on «generate your config».
A new window will open in which you will have to indicate the configuration parameters of the mining client:
OS: Your operating system (Windows / Linux)
GPU vendor: Select the manufacturer of your GPU (NVIDIA / AMD)
Worker name: Set the name of your worker, for example: «rig1» (try not to use blank spaces)
Email: Enter your email address.
Main server: Select the server closest to your geographical location.
First algorithm: Select the main mining algorithm, in this case we will choose Ethereum
First algorithm address: Your wallet address or Ethereum wallet (place here your Jahere Ethereum address)
Second algorithm: Select the secondary mining algorithm for dual mining, or if you prefer, select «none» to mine only Ethereum
Second algorithm address: Enter the wallet address of the secondary algorithm (if you are only going to mine Ethereum leave this box blank)
Once you have finished, click on «generate». Nanopool will create the necessary files to configure the miner. Upon completion, a compressed folder (claymore_config_nanopool.zip) with the following files will be downloaded:
epools.txt
start.bat
Extract these 2 files in the folder where you previously extracted the files from the Claymore mining client.
4. Execute the miner
Our mining client is now ready to start mining Ethereum. To start it, we just have to execute the file start.bat that we just extracted in the container folder, and once this is done, we will only have to wait for it to start. A new command window will open indicating the speed and other mining statistics. We will not need to do anything else.
Congratulations! You’re already mining Ethereum.
5. Check the status of your rig
Once we have started to mine, we can check that everything works correctly by entering our Ethereum address to the Nanopool website.
Enter the Nanopool Ethereum mining portal: https://eth.nanopool.org/
Copy the address of your Ethereum wallet or wallet and paste it into the search box located in the top navigation bar (where «Address» is indicated) and then click on «Search»
If everything works properly, a page will be loaded with the latest statistics of your mining rig, mining time, hashrate, income, etc.
Mining on a Windows PC, Verdict
As you can see, this is one of the easiest ways to mine Ethereum today. If you still have problems, or prefer a simpler method, there are some options available in the market, such as the mining clients like MinerGate (https://es.minergate.com/) and Nicehash (https: //miner.nicehash .com/).
These mining clients are recommended especially if you do not have much experience, since they have an intuitive graphical interface, and also have some advanced functions, such as mining the most profitable cryptocurrency of the moment automatically.
[:]
En 2018 la criptomoneda mas rentable para mi es Monero, por la reciente alternativa para minar, es el javascript mining un aliado perfecto para Monero ya que en esta practica es la criptomoneda usada, también es muy fácil de minar en paginas como CoinImp que simplifican dicha tarea a sus usuarios, esta es la cirptomoneda por la que voy en este año.